

The push-up is perhaps the most iconic exercise in the world. It requires no equipment, can be done anywhere, and serves as a true benchmark of functional strength. In 2026, as the “back-to-basics” fitness movement gains momentum, the push-up has reclaimed its status as a foundational pillar for everyone from elite athletes to those starting their fitness journey at home.
However, despite its popularity, the push-up is frequently performed with poor form, leading to shoulder impingement, lower back strain, and diminished results. Mastering how to do a push-up isn’t just about pushing your body off the floor; it’s about total body tension, joint alignment, and scapular health.
1. The Anatomy of a Perfect Push-Up: Why It’s Not Just a Chest Exercise
While most people view the push-up as a chest-builder, it is actually a moving plank. To perform it correctly, you must engage multiple muscle groups simultaneously:
- Primary Movers: The Pectoralis Major (chest), Anterior Deltoids (front shoulders), and Triceps Brachii (back of the arms).
- Stabilizers: The Core (rectus abdominis and obliques), Glutes, and Quadriceps.
- The Secret Ingredient: The Serratus Anterior. This muscle sits along your ribs and is responsible for “protracting” the shoulder blades, which keeps your shoulders safe and stable.
By engaging your glutes and quads, you turn the push-up into a full-body compound movement, which burns more calories and builds more functional stability than a standard bench press.
2. Step-by-Step Guide: The Standard Push-Up Setup
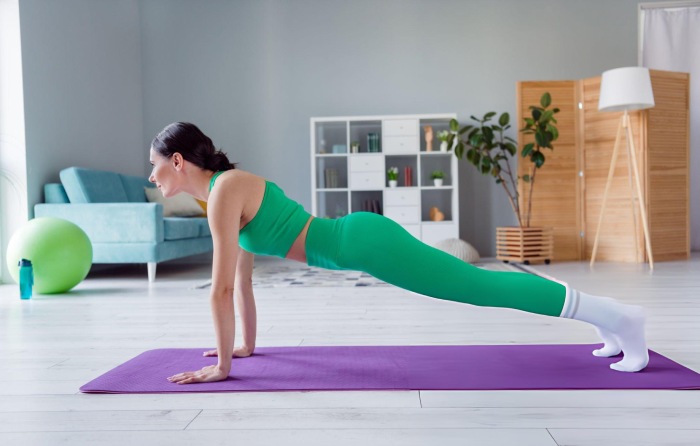
Setting the foundation is where 90% of the work happens. Follow these steps for the perfect starting position:
- Hand Placement: Place your hands slightly wider than shoulder-width apart. Your fingers should be spread wide, pointing forward or slightly outward to take the pressure off your wrists.
- The “Screw” Technique: Once your hands are planted, imagine trying to “screw” your palms into the floor outward. This creates external rotation in the shoulders, “packing” the joints into their sockets.
- Foot Position: For maximum stability, keep your feet together. If you find balance difficult, a wider stance (hip-width) is an acceptable modification.
- The Line of Power: Your body should form a straight line from your head to your heels. Do not let your hips sag (which strains the lower back) or your butt pike into the air.
- Head Alignment: Look about 6 inches in front of your fingertips. Tucking the chin or looking up at the wall ruins your spinal alignment.
3. The Execution: Controlled Descent and Explosive Drive
The movement itself consists of two phases: the Eccentric (lowering) and the Concentric (pushing).
- The Descent: Inhale as you lower your body. Focus on pulling your chest toward the floor rather than just “falling.” Your elbows should not flare out at a 90-degree angle (the “T” shape), as this causes shoulder impingement. Instead, keep them at a 45-degree angleto your torso (the “Arrow” shape).
- The Bottom Position: Descend until your chest is just an inch off the floor or until your elbows reach a 90-degree bend. Pause for a micro-second to eliminate momentum.
- The Drive: Exhale forcefully as you push the floor away. Imagine pushing the earth away from you rather than pushing yourself up.
- The Finish: Lock out your arms at the top and consciously “push through” the floor to protract your shoulder blades slightly. This ensures full range of motion.
4. Common Mistakes and How to Fix Them
If you find yourself struggling, check for these common “form killers”:
- The “Chicken Neck”: Dropping your head toward the floor to make it feel like you’re lower than you actually are. Fix: Keep your neck neutral and focus on the chest-to-floor connection.
- Sagging Hips: This usually indicates a weak core or “lazy” glutes. Fix: Squeeze your butt cheeks together as hard as possible and pull your belly button toward your spine.
- Elbow Flaring: High-angle elbows put massive stress on the rotator cuff. Fix: Tuck your elbows closer to your ribs.
- Half-Reps: Only going down halfway. Fix: Lower the intensity (see modifications below) to ensure you can achieve a full range of motion.
5. Modifications: From Beginner to Advanced
Not everyone can jump into a standard push-up immediately. Use these 2026-approved progressions to build your strength safely.
The Beginner Path (Regression)
- Incline Push-Ups: Place your hands on a sturdy elevated surface like a bench, table, or even a wall. This reduces the percentage of body weight you have to lift. As you get stronger, lower the height of the surface.
- Knee Push-Ups: While common, fitness experts in 2026 often prefer inclines because they better mimic the core tension required for a full push-up. If you do knee push-ups, ensure your hips are still tucked and forward.
The Advanced Path (Progression)
- Decline Push-Ups: Place your feet on a chair or bench. This shifts more weight to the upper chest and shoulders.
- Diamond Push-Ups: Bring your hands together so your index fingers and thumbs form a diamond. This heavily targets the triceps.
- Weighted Push-Ups: Wear a weighted vest or have a partner safely place a weight plate on your upper back to increase resistance.
6. Integrating Push-Ups into Your Routine
To see progress, consistency and volume are key.
- For Beginners: Aim for 3 sets of 5–8 reps of an incline version, 3 times a week.
- For Intermediate: 4 sets of 12–15 standard push-ups.
- For Strength: Focus on slow, 3-second descents (tempo training) for 5 sets of 5 reps.
The beauty of the push-up is its versatility. It can be a primary strength move, a finisher in a high-intensity circuit, or a quick “exercise snack” during a work break to boost circulation. By mastering the form outlined in this guide, you are building a foundation of upper body power that will serve you for decades to come.